
The Core: Linux Command Line Part II
Continuing the Linux Command Line. An extreme comprehensive article.

Greetings everyone! Continuing the “The Core: Linux Command Line” article. This article is mostly focused on File Permission and File Ownership management. Get ready your terminal and let’s GO.
Table Of Contents
So at this point, you are pretty familiar with linux.
The Manual of All Tools
Man
We will begin this article with the `man` command.
The `man` command aka “manual” stores the `help` menu and other necessary info about tools. You can use the `man` tool to learn the use case for almost every tool that exists. Now run this command `man ls`, this will show the manual for the `ls` command that we used earlier.

This will show you the manual in `less` utility which has a `vim` like interface. Although you cannot edit any words from this, you can search any string using the `/<string.` command. Now on the `man` page, type `/time` and you will see that all the words that match are highlighted.
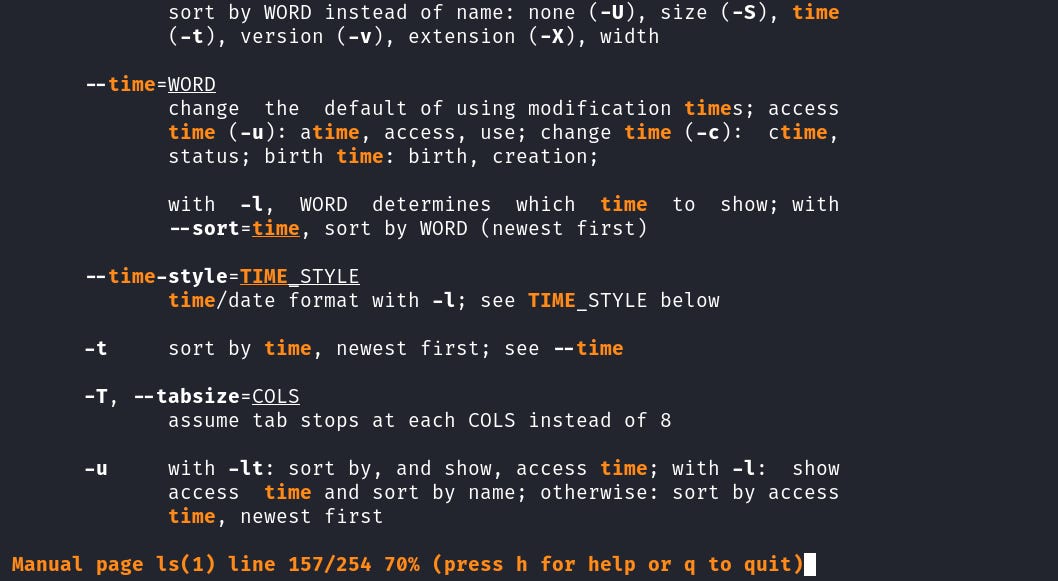
From there you can press `n` to go forward and `N` to go backward. You can use the “space” key to scroll down as well as the “arrow” keys. Since it has a `vim` like intereface you can also use the vim navigation keys. To learn more about `man` commands you can press the `h` key. And once you are done just press `q` and it will exit to the terminal.

Now if you had noticed, earlier we marked the `ls` man page. Let’s see why.

By default, or to be precise often we only use the “User Commands” manuals but `man` contains more than the “User Commands”. It has other documentation containing administrator commands programming commands and more. You can have a quick look at the list here.
1 —> User Commands
2 —> System Calls
3 —> Library Functions
4 —> Special Files
5 —> File formats
6 —> Games
7 —> Miscellaneous
8 —> System Administration
Each type of manual has a number assigned to it. For “User Commands” it’s “1”, and that’s the reason for the second highlighted text (2).
If you want to find out how many modes a command has you can just use the `apropos <tool-name>` command. Find more about this tool using the man page.

You can skip this part. But Only knowing that it exists would be enough for now.
The use of the man command when specifying the mode would be `man <mode> <command>`. E.g. `man 1 ls`.
This would return the same result as without the mode. Because the `man` command automatically detects the mode. Unless there is more than one mode for the same command.
You can also use the `-k` option. E.g. `man -k grep` will show all the modes that are available for `grep` this includes other tools that use the grep. (This is similar to the `apropos` command).

As I said It will show all the commands that it finds a match to the input strings.
File Permission
Now with that warmup. Let’s begin with one of the core of Linux: The File Permission. Go to the `home` directory and execute `ls -l`.

From the right side, the first column contains the file/dir name. Followed by on second is file/dir “creation date and time”. And on the third position is the “file size”. One thing you might wonder why is all the directories are the same size. Because this isn’t the actual size of the dirs. It only shows the size the dirs use to store metadata of the number or size of files in the directory. We will see how to look at the actual size of a “dir” later.
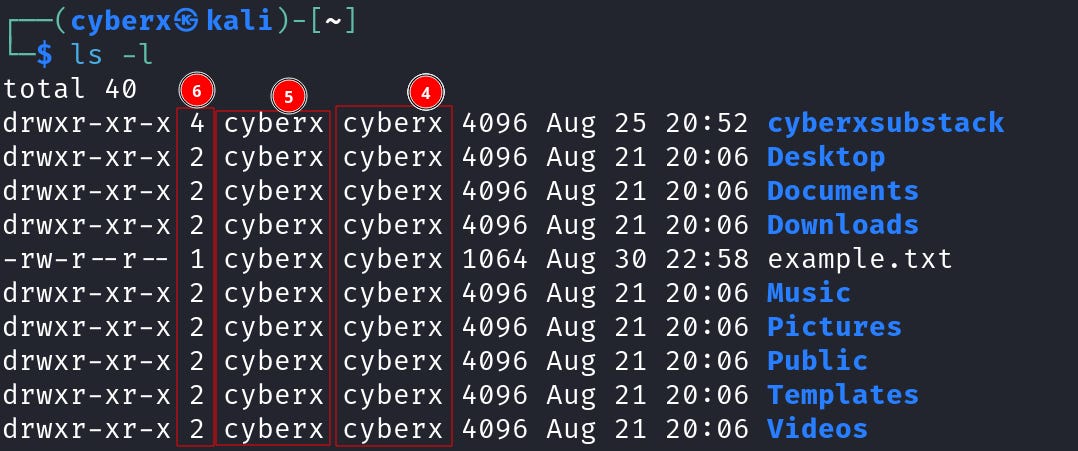
Back to where I left, the fourth column tells which group the files belong to. But before that what is a group?
In Linux, there are generally two types of file ownership, user ownership and group ownership. “User Ownership” is when a fire, directory, or asset is directly accessible by that specified user only. “Group Ownership” is when a file directory or an asset is accessible by all the users within that group.
As you may have guessed there could be some files, directories, or assets that more than one user needs to access. So we can’t just assign all the users to that asset. Because the “User Ownership” only works for a single user. That’s why the “group” is created. This way, if an asset is needed by more than one user we can just put the users in a “group” and change the ownership of that asset for that group.
And the fifth column shows, which “user” the file/directory belongs to (5). We already learned what is “User Ownership”.
Now the 6th column shows the number of hard links associated with that file or directory. Although this information is not something that’s used in day-to-day tasks.
What is Hard Link?
“It’s like having the same ‘inode’ (explained in the previous article) for two or more directories/files in the same or different name.”
Read it again!
Now, let’s understand this by example.
Navigate to the user’s home directory. And execute the `ls -l` command again.
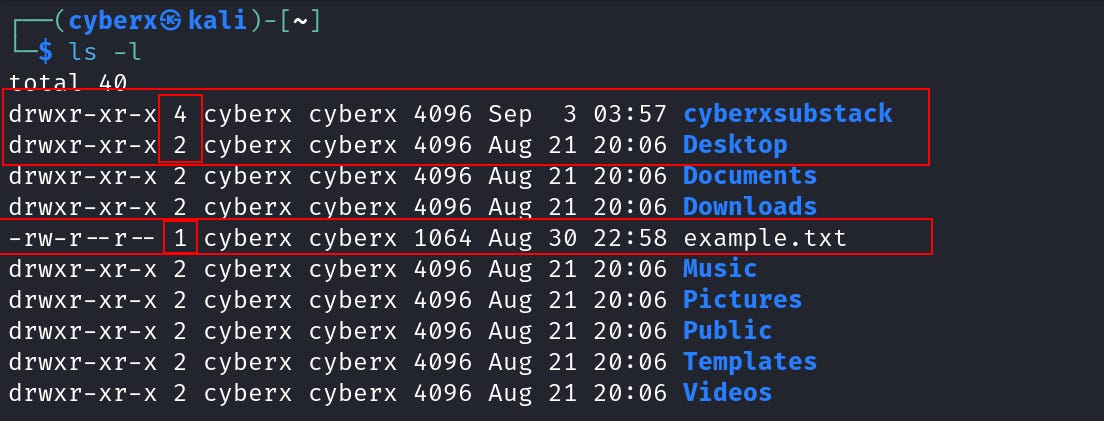
Now just focus on these two directories “cyberxsubstack”, “Desktop” and the file “example.txt”. Note their “hard link” number.
Now let’s start with the “Desktop”. Here the “hard link” is 2, this means that there should be another directory with the same inode. Let’s find it.
To do this I will use the `find` command (we will learn it later). Execute this command `sudo find / -type d -samefile Desktop`.
This command will search for the given directories in the root path. Meaning it will search all occurrences of this file.

But it’s only returning us one location and one file. And we should have two according to the hard link. Why is that?
Do you remember the “..” and “.” directory that we learned in the previous article?
As we know, each directory contains the “..” and “.” dir inside them. If you recall the “.” represents the directory itself.
That’s the reason we see two “hard links” but not two dirs. Because the other dir is inside that dir the “.”.
E.g. Execute this command `ls Desktop` and also from inside “Desktop” `ls .`.
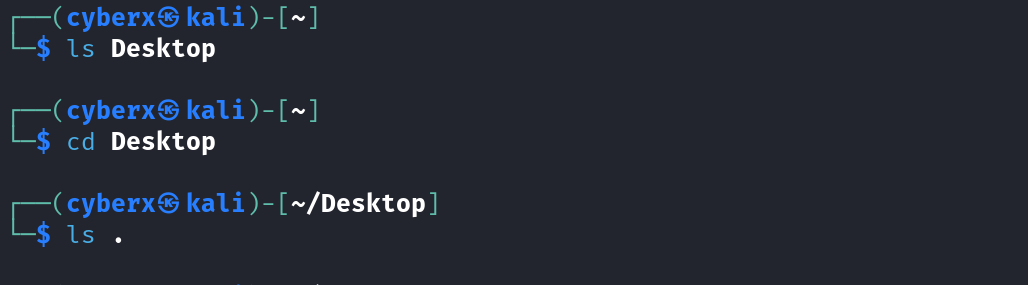
Noticed how using the dir name and “.” both give us the same result. In this case, the directory is empty that’s why we don’t see anything. Let’s create a file and execute these commands again.

Now it’s much clearer, So the final answer is “Because the “.” actually represents the directory itself, we are getting the “hard link” 2.
If you are finding this hard, don’t worry. The next and the following example will clear up everything.
Now get back to the home directory. And this time let’s check the “cyberxsubstack” directory.

The hard link count is “4”, as we already know one is the dir “cyberxsubstack” and the other one is “.” (representation). That leaves us two more directories. Let’s find them.
Execute the `ls cyberxsubstack` command.

Did you notice the two directories inside it? You should also remember the “..” that represents the parent directory. And here the parent directory is the “cyberxsubstack”. That’s why we are seeing “4” in hard link count.
To better understand that, let’s create another new directory `mkdir newdir`.

Get back to home. And execute this command again `ls -l`.

Noticed how the “hard link” increased.
Now that you have a little warmup about this let’s get to the “ultimate example”. That will clear everything.
Execute this command `ls -li` in home.

Note this “inode” number. And cd into the “cyberxsubstack” directory.
Now execute `ls -lai` inside the “cyberxsubstack” directory.
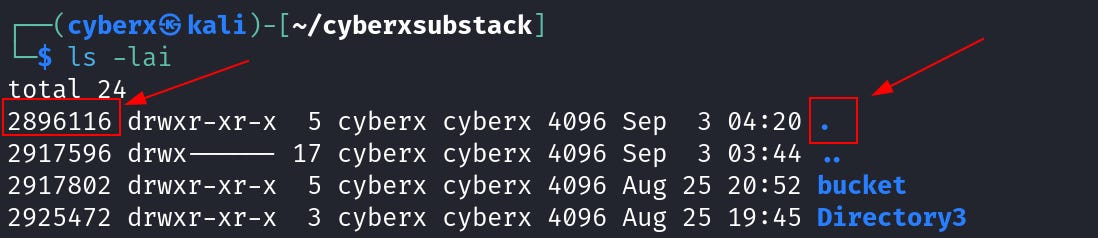
Notice how the “inode” number for “.” is the same. Now go inside the “bucket” directory. And execute this command again `ls -lai`.

See, how the “inode” for “..” inside the “bucket” dir is the same as the main directory.
I hope this clears what a “hard link” is and how the “number” in column 6 works.
You will not see this kind of in-depth information in a Google search. Most blogs from Google will just tell you that it’s the “hard link” number, nothing extra.
Here I am dedicating my time and skills to provide you with “in-depth” meaning of things. Please consider subscribing if you haven’t already.
Now before taking a break, you shouldn’t forget about “example.txt”. Let’s get to its “hard link” number. And find out why.

The “example.txt” shows only one hard link. Because there is only one. Unlike the case with directories, we can use the command `find / -type f -samefile filename` to find all occurrences of the same file and it works.
Let’s execute this command `find / -type f -samefile example.txt`. The difference between `-type d and f` is “d” is for the directory and “f” is for files. (more about this later).
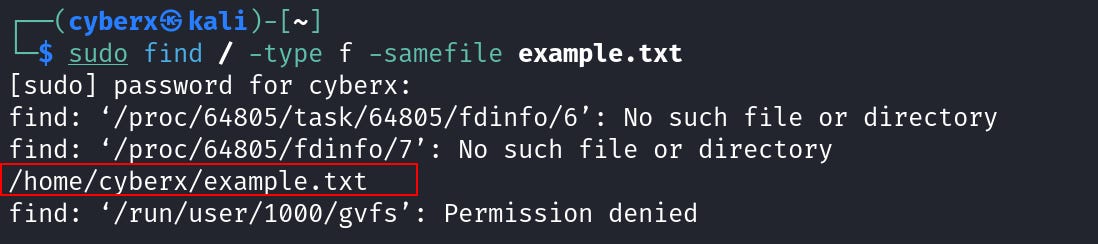
Only one file, you can ignore the errors or use this at the end `2> /dev/null` (will come to this later). This will nullify the errors.

Now let’s create a “hard link” to that file (more about this later). Execute the command `ln /home/cyberx/example.txt /home/cyberx/cybyerxsubstack/example.txt`. Replace the home directory with your username.
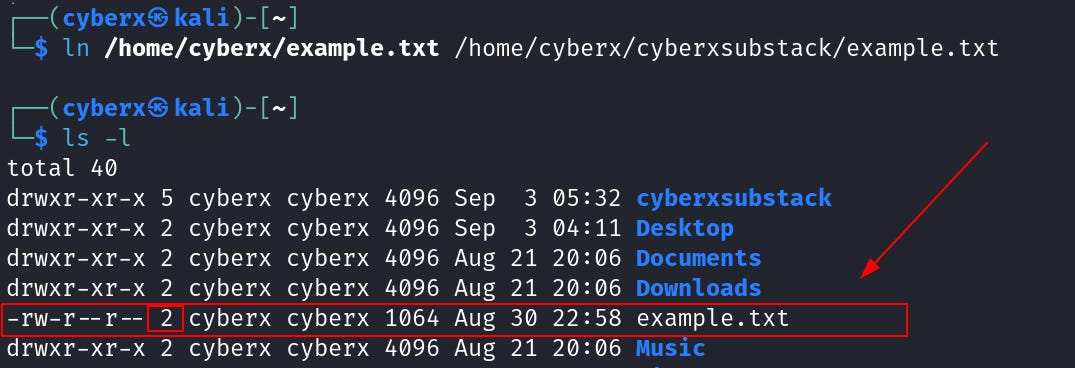
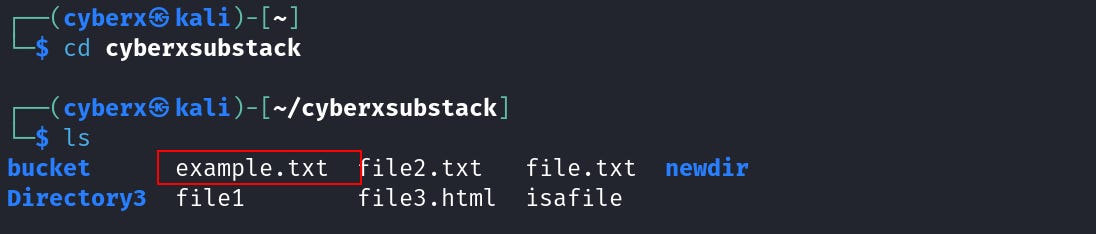
Now it’s showing “2” hard links as expected. Let’s check the file inside the “cyberxsubstack” directory.
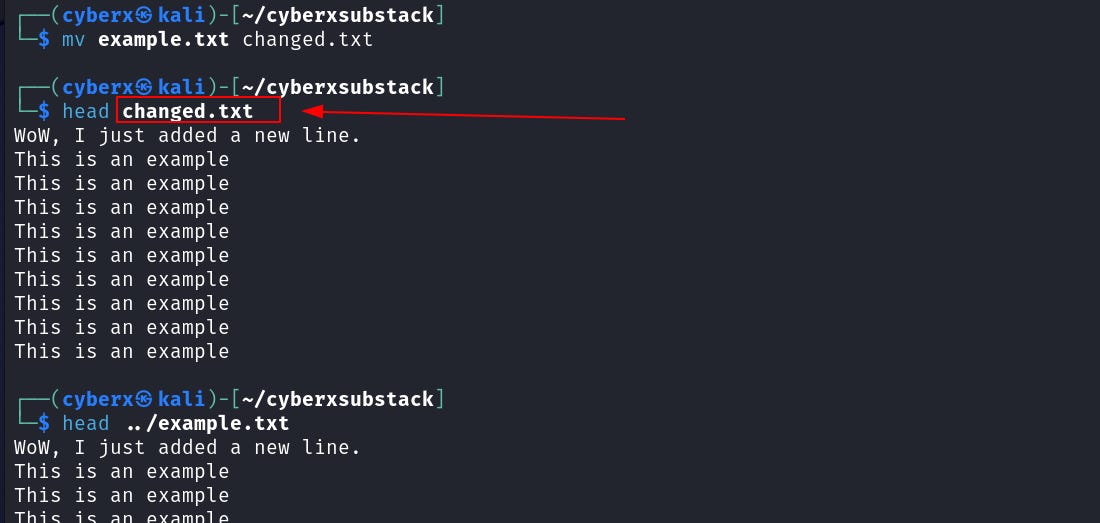
Now let’s view the contents for both files using `head`.

Both show the exact same example. Let’s add a new line at the top for the “example.txt” that’s inside the “cyberxsubstack” dir.

Now view the files again.

SEE, how changing the file inside the “cyberxsubstack” dir also changed the file in our home directory. This is because of the hard link.
But what “If we change the file name”. Let’s find out.
Same as before, remember the example of the “mv” command when renaming. Since the files or dirs are stored in “inode” the name doesn’t matter.
Now let’s run the `find` command again.

And this time we have two files.
Exercise: Check the “inode” for both files.
If you haven’t completed the previous article this article wont be able to give you the max output. Please read the previous article here.
The Core: Linux Command Line

Greetings Everyone! This will be our first article in the substack. We will be learning “Linux” more specifically “Linux Command Line”. It doesn’t matter if you wanna be a cybersecurity professional or not. Learning Linux CLI is the front gate to IT. This is where all the magic begins.
Everything you are going to learn here depends if you do what I told you to do. This is a “Hands-on” substack. So if you don’t execute the instruction I give you. You wont be able to get the maximum output” Keep it NOTED.
Now it’s time to take a break. Come back when you are relaxed.
So, now that we have cleared all the columns except for the last one. It’s time to give that a go. The reason I kept it in last is because it would take a good concertation to understand. Let’s get into it.

This permission matrix has “4” fields. The first field tells you if it’s a file or directory. For directory you will see “d” in the first field and if it’s a file you will see “-” (1). As you can see in the image all the directories contain “d” but the example.txt file.
Now for the remaining fields the permission is all the same “rwx” where “r=read”, “w=write” and “x=execute”. Read means that the file is readable, write means the file is writable, and execute means the file is executable. (We will get into this in a short time).
Now if they are all the same why are there three fields? This is because the “first” field represents the “user” permissions, the “second” represents the group permission, and the “final” represents the permission for “all other users”.
Read: When a file is readable in any of the fields (user, group, other). This means that the users, groups, or all users can access the file and only read it. They cannot “edit” aka “write” into that file or directory. If the read is in the user field means the user can read. If it’s in group fields that means all the users belonging to this group can read. And for the last one means all users can read.
Write: When the write permission is set in any of the fields (user, group, other). This means that the users, groups, or all other users can write into the files (only write). This means they cannot read the files. And the rest is the same just replace the read with write.
Execute: The term “execute” mostly refers to running a program not a regular file (e.g. text, pdf, image). So if the user group has this permission set they can execute the program same goes for the remaining two.
So now you understand what all three fields are. And what is the meaning of the “rwx”. Now we will get into how you can set the permissions.
Chmod
`chmod` (change mode) is the linux utility that we use to change and and remove permissions from a file or directory. Check out the man page of `chmod` using `man chmod`. Let’s get into it.
Syntax: `chmod <option> <input-file-dir>`
In `chmod` there are two types of option mode, 1. Numeric Mode, and 2. Symbolic Mode. But before getting into that let’s change the “example.txt” that we created.

Right now, the example.txt has “read, write” for the owner, and “read” for the group and others. Let’s add execute permission to the file.

So here we added execution permission to the file including owner, group, and others. And you can also see the file color has been changed.
Now let’s give “read, write, and execute” permission to the user, group, and others.

And we have “rwx” in all three fields, and this is the maximum permission a file can get. Obviously, it’s limited to the user’s ability.
Now in the first example, we used the “Symbolic Mode”, and for the second example we used the “Numeric Mode”.
Symbolic Mode
This mode uses the symbols `+` (for adding permission), `-` (for removing permission), and `=` (to set permissions explicitly). And the permission group letters `u` (for user), `g` (for group), `o` (for others) and `a` (for all three).
The permissions are the `r` (for read), `w` (for write), and `x` (for execution).
Okay, the symbols are a little confusing. Let’s clear them up using real examples.
Execute this command `echo 'echo "Hello World, or maybe Hello Substack"' > script.sh` (This will be described later).
This will create a file with the string inside.

Now let’s view the file permission for it.

Now let’s remove all the permissions first. Execute this command `chmod a-rwx script.sh`.

So here we removed all the permissions. And let’s see what we did.
`a` is used to select all three fields “user, groups, and other”. The `-` is used to “remove” the permission and “rwx” defines what permission to remove. In this case, it’s all “read, write, and execute”.
Now let’s add read permission to the user only. Execute this command `chmod u+r script.sh`.
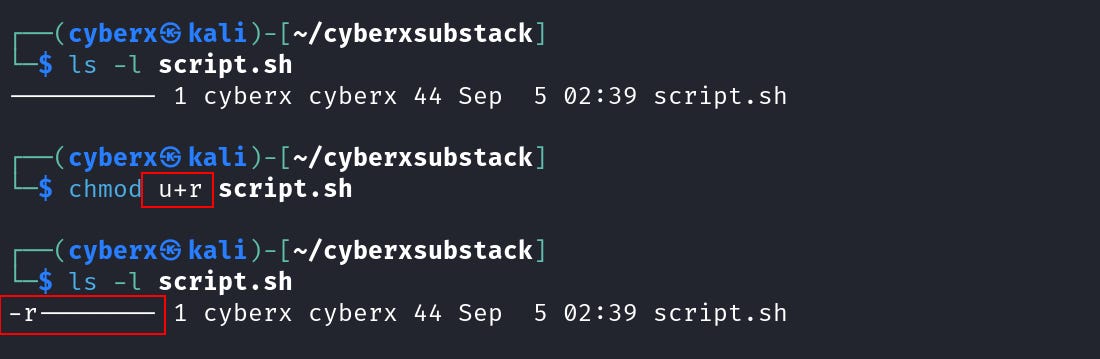
And we added read permission to the user. Here the `u` selects the “user” field, `+` is used for “addition” and `r` tells to add “read” permission.
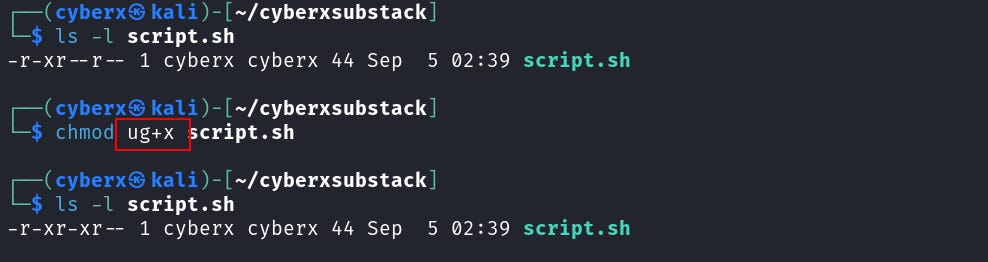
I hope it’s getting clearer now. So what if we want to add permission to the group and others?
Just change the first field `u` to `g` for group `o` for others and `a` for all.

Now what about adding other permissions like write or execute?
In this case, you just have to change the field after the `+` with `r` for read, `w` for write, and `x` for execute.

Alright! So how to add permission to “user + group”, “group + other”, or “user + other”?
You can just combine the mode, e.g. for user `u` for group `g`, the combination is `ug`. It’s as simple as that.
WELL, now we learned how to add permission and how to remove it from the “user, group, and others”.
Note: If no “user, group, or other” is defined it will change the permission for all three as you’ve seen in the first example.
Numeric Mode
The numeric mode is where you’ll have to do a little calculation in your head before setting the permission.
The numeric mode takes a three-digit number, where the first digit is for “user” permission, the second is for “group” permission, and the third is for “others” permission. For `chmod 764 file.txt`, here the “7” is in the user digit, the “6” is in the group digit, and the “4” is the “others” digit.
Now what do the “digits” actually mean? They are the addition of the permission “rwx”. Look at the list below.
4 —> Read Permission number
2 —> Write Permission number
1 —> Execute Permission number
0 —> No Permission Number
And so for “Read and Write” we just have to add the numbers, e.g. “Read = 4, Write =2” so “Read + Write = 6”.
That’s how we combine the permissions. Let’s see it in action.
Execute `chmod 000 script.sh` and you will see all the permission has been removed.

Now, let’s give the user “all” permission and the group “read and write” and for others only “read”.
So, for “all” —> (4 + 2 + 1 = 7), for “read and write” —> (4 + 2 = 6), and for “read” (4 = 4). So the final number is “764” easy enough.

And there it is the permission is all set. Play with this, and try to set permission for all connections. The permission set for files and directories is the same no extra command is necessary. I left a little gap there, try to fill that on your own.
Now if you are that person who’s thinking why “4, 2, 1” Why not “9”, “8” or other numbers? Well, it’s not a complex matter, we usually don’t need to know this. But if you are curious one. Here is the simple brief.
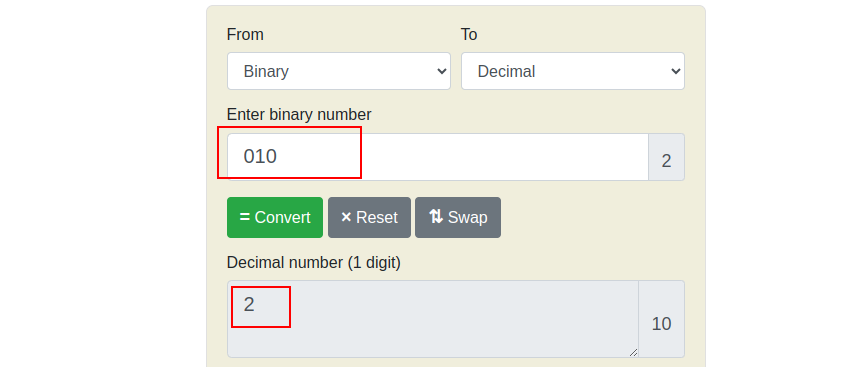
The linux architecture design uses the “rwx” as a three-digit binary’ E.g.
r w x
0 0 0
^ ^ ^
1 0 0
In this case, we enabled the first binary to “1” thats the binary for “read”, and the others are “0”, which means the “wx” is not enabled. Now if we convert the binary “100” to decimal we will get the value “4”.

r w x
0 0 0
^ ^ ^
0 1 0
In this case, we only enabled the “write” binary, and the others are “0”. And now if we convert it to decimal.
And if we enable the “x” binary, it’s “001” that in decimal will be “1”.
r w x
0 0 0
^ ^ ^
1 1 1
And so if we set all the bits, it will be “111” that is in decimal “7”.
I hope this makes sense to you. This article is not about the “number system” or how to convert them. But we may release one article on that.
You can go to this site RapidTables to satisfy yourself by trying all the combos within three digits.
Now it will only take some practice before you become master on file permission.
File Ownership
The file permission and file ownership are not too far. But it’s easier than the “file permission”. This lets us decide who owns a file, which group, and how to set them up.
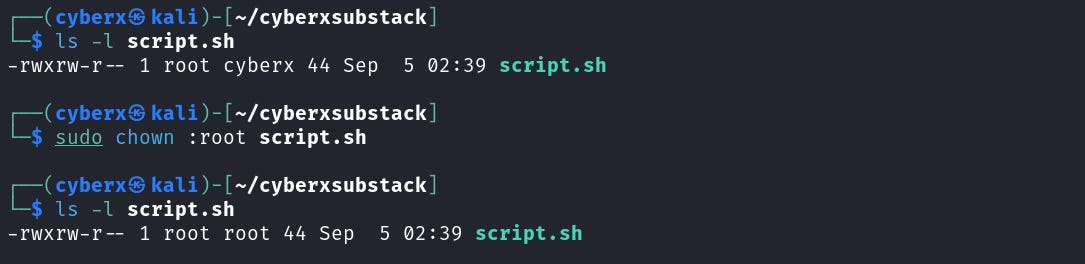
Chown
The `chown` (change owner) is used to change the file/dir ownership. The syntax is simple `chown user filename`.

You can also use this command to change the group. For that the syntax will be a little different `chown :groupname filename`, noticed the “:” when changing group you will have to use it.
You can also combine the user and group, and change them at once using `chown user:group filename`.
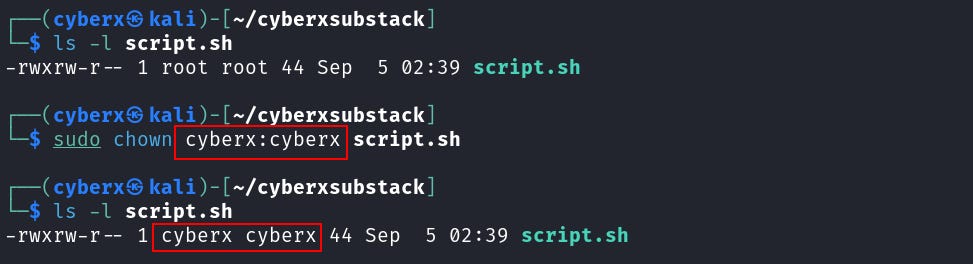
Here, we mostly use the “user:group” pair when changing the files. But you can use it any way you like. And remember this will require `sudo` permission or you’ll have to be a root user. (We will learn about users later).
Chgrp
I’ve never used the command `chgrp` never needed. But this will allow you to change the group. The syntax is `chgrp <new_group> <file>`.

That’s pretty much it. There’s other option for the commands but you are less likely to use them.
Syntax: Syntax is the special string pattern that’s used in programming and commands. E.g. Here we used `chown` then the `option` then the `file`. This is a syntax this also could’ve been like this `tool_name <filename> <options>`.
Conclusions
We will put an end to this article here. It’s been way too long. But no worries! the other parts of it will be rolling in soon. So what you should do now, is “subscribe”, and “like” to get all the updates. And practice a lot in your virtual system (If you mess up you can always renew the virtual machine).
And if you are facing some problem, or just want to talk. We have a discord ready for that Join here —> Discord.
Please show your support by sharing it with others who might need it. It takes quality efforts to make the articles. Thanks for being with “Cyber Security Hands On”